- (877) 307-0052
- info@whyreboot.com


Steps
If you haven’t already done so, please download the SonicWALL Global VPN Client for your PC from our downloads page here
Supported Windows Clients and Firmware
The SonicWall Global VPN Client 4.9.9 operates on 32-bit and 64-bit versions of:
- Windows 10
- Windows 8.1
- Windows 8
- Windows 7
- Windows Vista
Pre-Installation Recommendations
SonicWall strongly recommends you follow these steps before installing the Global VPN Client (GVC) 5.0.0.1120 client:
- If you have SonicWall Global VPN Client version 4.9.9 or earlier installed, you must uninstall that version before installing version 5.0.0.1120.
- SonicWall GVC encounters run time conflicts when it co-exists with any 3rd party IPsec VPN clients. Uninstall all IPsec VPN clients prior to installing SonicWall GVC.
Quick Start Installation
To install GVC using the setup wizard, follow these steps:
- Download the self-extracting installer, GVCSetupXX.exe (where XX is either 32 for 32-bit Windows platforms or 64 for 64-bit Windows platforms), from MySonicWall.
- Double-click GVCsetup.exe
- The Setup Wizard launches.
- Click Next to continue installation of the VPN Client.
- Close all applications and disable any disk protection and personal firewall software running on your computer. Click Next to continue.
- Select I accept the terms of the license agreement. Click Next to continue.
- Click Next to accept the default location and continue installation.
- Click Install to install the Global VPN Client files on your computer.
- Select Start VPN Global Client Automatically when users log in to automatically launch the VPN Global Client when you log onto the computer, if desired.
- Select Launch program now to automatically launch the Global VPN Client after finishing the installation.
- Click Finish to complete the installation.
Now open the program and select File on the top bar, then choose New to create your connection. The Wizard begins. Click Next.
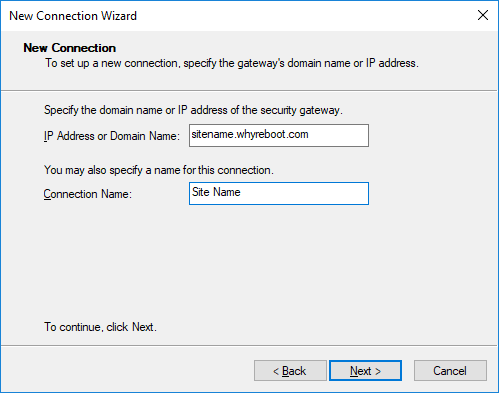
Enter your DDNS name that was provided to you. Do NOT enter any port numbers or anything else, just the name or IP address as in the screenshot below. Here you will also name the connection whatever you like:
Click Next and then click Finish.
Double-Click your new connection. Upon the first attempt you will be prompted for your pre-shared key. Enter the information you were provided and click to move on. Note that the pre-shared key is NOT your username or password. If you do not have a pre-shared key then please reach out to us to retrieve it, or check the Bibliotek documentation portal found at http://bibliotek.whyreboot.com.
Next you will be prompted for your username and password. Enter those and if this is the first time you are connecting it will prompt you TWICE for this info.
That should be it. If you receive an authentication error then please remember that all fields are CASE SENSITIVE.
As a recap, the connection information would be:
Server: <yoursitename>.whyreboot.com
Username: <yourusername> (case sensitive)
Password: <yourpassword> (case sensitive)
If you need additional assistance please call us at 877-307-0052 and ask for support. Or if you prefer you can also email us at support@whyreboot.com